Kubernetes Deployments: Types, Features & Key Strategies


At first glance, the meaning of a Deployment in Kubernetes might seem simple enough. The term refers to any type of application that Kubernetes admins have deployed into their cluster, right?
Not quite! A Deployment is one way to deploy applications in Kubernetes. But it refers to something more specific (hence why we capitalize the term Deployment in this context) than an application deployment in the generic sense because Deployments in Kubernetes are designed for particular types of applications – namely, stateless apps that don’t have special requirements, such as the need to run on all nodes. There are other ways to deploy Kubernetes applications, like StatefulSets and DaemonSets, that are distinct from Deployments.
This is part of the reason why it’s essential to understand the details of how Deployments work, their differences from other application deployment methods, and how to manage Them Effectively. Keep reading for guidance on these topics and more as we break down the ins and outs of Kubernetes Deployments.
What are Kubernetes Deployments?
Kubernetes Deployments are a type of object that can host applications.
More specifically, a Deployment includes one or more Pods, and each Pod contains one or more containers – which host the individual microservices necessary to run an application.
The Pods in a Deployment don’t have unique identities, which means that if they shut down and restart, the restarted Pod will not be able to reference any stateful data created by the original Pod. In addition, the Pods in a Deployment can be scheduled on any node – which means Kubernetes will automatically decide where to place them – unless you add parameters, such as node selectors, to the Deployment that tell Kubernetes to schedule the Pods to run on specific nodes.
Kubernetes Deployments vs. StatefulSets and DaemonSets
As we mentioned in the intro, Deployments aren’t the only way to deploy applications in Kubernetes. Other types of resources that admins commonly use for this purpose include:
- StatefulSets, which provide unique and persistent identities for Pods. StatefulSets are typically used for running stateful applications, meaning those that need to preserve data persistently across restart events, such as a database. Having a persistent Pod identity (which Deployments lack) is a prerequisite for running a stateful application.
- DaemonSets, which deploy a copy of a Pod on multiple nodes. It’s also possible to use Deployments to run Pods on various nodes, using configuration options such as node selectors; however, doing so is simpler when you use DaemonSets. The most common use case for DaemonSets is situations where you need to run a specific application (such as a logging or monitoring agent) on every node in your cluster. (You don’t necessarily need to run a copy of a Pod on every single node if you use a DaemonSet – you can restrict them to only some nodes – but DaemonSets make most sense when you want to run a Pod across a large number of nodes.)
Why Kubernetes Deployments matter for modern applications
Kubernetes Deployments are beneficial for running modern, cloud-native apps for several reasons:
- Declarative configuration: To create a Deployment, admins write code (typically using YAML) that defines the Deployment, and Kubernetes then creates the Deployment accordingly. This code-based approach makes it easy to create and manage complex apps at scale.
- Self-healing: If the Pods or containers in a Deployment fail, Kubernetes will automatically attempt to fix the problem. This is another way that Deployments make life simpler for admins, since they don’t have to worry about restarting crashed apps manually.
- Server-agnostic deployment: As we mentioned, Deployments by default can run Pods on any server in a cluster. Kubernetes will automatically schedule Pods in Deployments based on factors like how much CPU and memory is available on a given node, and whether resource availability aligns with the requests and limits of a Deployment (if they are defined). This eliminates the need for admins to decide manually which servers should host which workloads.
Kubernetes Deployment architecture and internal mechanics
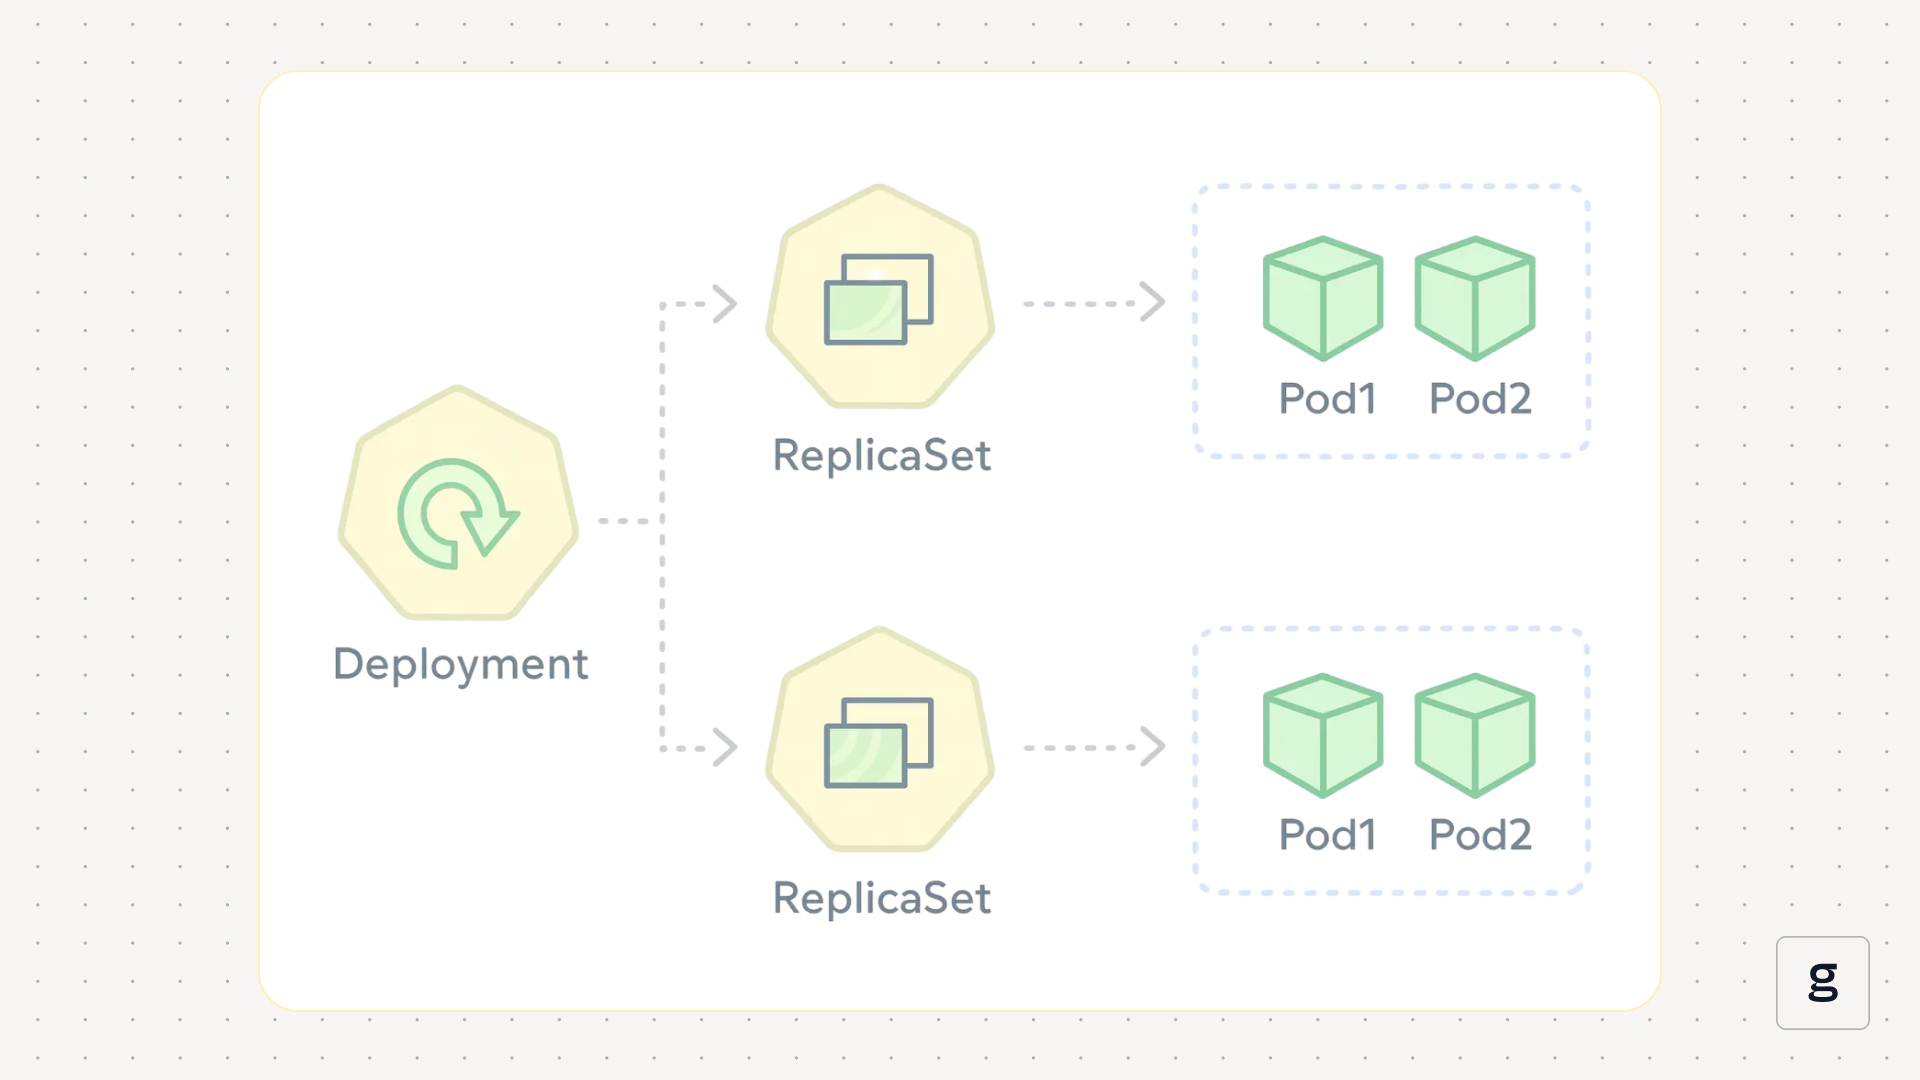
The architecture of a Deployment in Kubernetes is relatively straightforward. It includes three key components:
- Pods: Each Deployment hosts one or more Pods (a Pod is one or more containers designed to run an application). If multiple Pods are present, it’s usually because admins configured replicas when defining the Deployment. Replicas tell Kubernetes that a Deployment should maintain multiple copies of the same Pod.
- Containers: Each Pod includes one or more containers. The containers host the code that an application needs to run.
- Nodes: The Pod or Pods in a Deployment are hosted on nodes (which are servers within a Kubernetes cluster). Normally, if the Deployment includes Pod replicas, each replica would run on a different node; however, Kubernetes may sometimes schedule multiple replicas on the same node, in the event that it can’t find sufficient available nodes to distribute them across nodes.
Key features of Kubernetes Deployments
The main features of Deployments include:
- Simple application hosting: Deployments are the simplest, most straightforward way to run an application in Kubernetes.
- Automated restarts and self-healing: Pods within Deployments will automatically restart if they crash.
- Optional node selection: You can assign Pods in a Deployment to specific nodes if desired, using node selectors.
- Optional replicas: You can also require multiple replicas of a Pod within a Deployment, if you wish.
Deployments lack other features that are important for some use cases, like assigning persistent identities to Pods. But that’s kind of the point of Deployments: They keep things simple by allowing you to deploy applications with minimal configuration requirements. If you need to support more complex use cases, you’d use a different type of resource (like StatefulSets) that provides the additional features you require.
Types of Kubernetes Deployments
Deployments can be categorized based on the way they manage application lifecycles. Here are the four main types of Deployments.
Rolling update
Under the default Deployment behavior, known as rolling update, new Pods will gradually replace old Pods. The major benefit of this approach is that it allows you to update a Deployment while avoiding application downtime in most cases.
You can configure rolling updates by including a section like the following in a Deployment spec:
You can also optionally specify parameters like maxSurge and maxUnavailable, which control how many spare Pods Kubernetes should keep on hand when performing a rolling update.
Recreate deployment
With a recreate deployment, all existing Pods are terminated and replaced with new Pods immediately whenever a Deployment update occurs. This causes downtime, but it’s desirable if your goal is to apply an updated version of an application as soon as possible.
To configure a recreate Deployment, specify this option in the Deployment’s spec:
Canary Deployment
A canary Deployment keeps two versions of an application running – an old and a new one. Some users are connected to the old one, and some to the new one.
Canary Deployments are useful because they make it possible to expose an updated app to a subset of users before pushing it out to all users. This can be helpful for detecting bugs before they affect all users, or for releasing bleeding-edge features to “power users” before your general user base.
Kubernetes doesn’t provide built-in tooling for creating a canary Deployment, but you can set one up by configuring two separate Deployments (one for each version of your application), then creating a Service that distributes traffic between them using native Kubernetes load balancing. For more granular control over which traffic routes to which Deployment, you can use a service mesh to balance load.
Blue-green Deployment
Under blue-green Deployment, two versions of an application run simultaneously. One (the blue version) is a stable release, while the other (green) is a version that still needs to be validated. All traffic flows to the blue Deployment until testing is complete on the green one, at which point all traffic cuts over to the green one.
Blue-green Deployments are useful because they allow you to test and validate an application in a real-world production environment, then switch traffic over to it without having to redeploy the application. In this way, the blue-green method reduces the risk that your tests will miss bugs because you didn’t perform them in the same environment that you plan to use in production.
Like canary Deployments, there is no built-in way to tell Kubernetes to create a blue-green Deployment. But you can implement one by creating two separate Deployments (one for each version of your app), as well as a Service. Initially, the Service should direct traffic to the blue Deployment, and you’d modify the service to switch to the green Deployment after validation is complete.
Common challenges in Kubernetes Deployments
Although Deployments are a pretty simple type of resource, you may still run into problems when working with them. Common challenges include:
- Unpredictable resource usage: By default, Pods within Deployments can consume as much CPU and memory as they want. This may lead to situations where a Deployment becomes a “noisy neighbor” by sucking up more than its fair share of resources. Setting requests and limits can help to distribute resources more evenly between Deployments and mitigate this risk.
- Insufficient nodes: There is no way to guarantee magically that nodes with sufficient CPU and memory will be available for a given Deployment. It’s important to monitor the overall resource availability of your cluster and ensure that it can support new Deployments.
- Downtime risks: During updates, there is a chance that the application hosted within a Deployment will become unavailable. Methods like rolling updates can help to prevent this, but there is still no hard guarantee against disruptions. For example, a new Pod could end up in a crashloopbackoff state during a rolling update because of a bug in an updated container image, leading to an application outage.
Best practices for managing Kubernetes Deployments
To get the most value out of Kubernetes Deployments while mitigating risk, consider these best practices:
- Only use Deployments for the right use cases: As we’ve explained, Deployments aren’t a good choice for running stateful applications, or in situations where you need to host a Pod on multiple nodes. Avoid using Deployments when a different type of resource would work better.
- Include requests and limits: While you don’t need to define requests and limits for a Deployment, doing so can help to mitigate risks related to excess resource usage.
- Define an update strategy: Specifying an update strategy also gives you more control over how Kubernetes will manage a Deployment. It can help achieve the best balance between rapid updates and application uptime.
- Monitor Deployments continuously: You can tell Kubernetes what a Deployment should do, but the only way of validating that it’s actually doing it is to monitor the Deployment. Specifically, you should track the CPU and memory usage of the Pods in a Deployment. You should also monitor for events like Pod failures. And you should make sure that the number of replicas you’ve specified actually exist.
How to Create a Kubernetes Deployment, step-by-step
The process for creating a Kubernetes Deployment is relatively simple. Here are the main steps.
1. Define the Deployment
First, write YAML code that defines the core elements of the Deployment. At a minimum, your definition should include:
- Metadata that defines a name for the Deployment.
- Selectors to match the Pod or Pods managed by the Deployment.
- The image and name for at least one container to include in the Deployment.
Here’s an example of a minimal Deployment:
2. Add optional parameters
Optionally, you can add other parameters to the Deployment, such as:
- Node selectors, if you want to control which nodes Kubernetes can use when scheduling the Deployment’s Pod or Pods.
- An update strategy to control how Kubernetes will manage Deployment updates.
- Network port settings, to expose specific network ports for the Deployment’s containers.
For instance, here’s an updated version of the sample Deployment from above with these additional parameters:
3. Save and apply the Deployment
After you’ve finished defining the Deployment using YAML code, save the code to a file (such as my-deployment.yaml), then apply it with kubectl:
At this point, Kubernetes will automatically schedule Pods and containers based on the settings you declared in the Deployment file.
4. Verify Deployment status
To check the status of a Deployment, you can use the following command:
The output will show the state of all existing Deployments. For example:
Automating Kubernetes Deployments with CI/CD pipelines
One of the cool things about defining Deployments using code is that it makes it easy to manage Deployments automatically as part of a Continuous Integration/Continuous Delivery (CI/CD) pipeline.
To do this, include your Deployment templates in code repositories, then configure your CI/CD tools to apply the templates automatically when relevant conditions are met (such as when a new application release passes all of its tests). This way, you can automate the process of applying a Deployment and pushing out a new application release as a single step (so long as the Deployment template refers to the container images for the application release).
Scaling strategies for Kubernetes Deployments
.png)
You can scale Kubernetes Deployments by creating Pod replicas within them. When present, a replica setting tells Kubernetes to maintain multiple copies of a Pod at all times.
This is useful when you want to scale a Deployment. You can add replicas when your application experiences increased demand, then scale down to save resources afterwards. Learn more in our guide to scaling Deployments.
Security considerations in Kubernetes Deployments
Deployments themselves don’t normally contain any type of sensitive data. But they may interact with other sensitive or vulnerable resources. For that reason, it’s important to address Deployment security considerations, such as:
- Container images: Ensure that the images used in a Deployment are up-to-date and free of vulnerabilities. As a best practice, avoid the :latest tag, since this can increase the likelihood of pulling a bleeding-edge image that has not yet been vetted from a security standpoint.
- Node security: Ensure that the nodes that host Deployment Pods are secure by hardening their operating systems and removing unnecessary applications or surfaces (which create a larger attack surface).
- Network security: Avoid exposing vulnerable ports in a Deployment.
- Limits and requests: To mitigate the risk that a compromised Pod could disrupt other workloads by consuming all available CPU and memory, consider including limits and requests within Deployments.
How groundcover simplifies Kubernetes Deployments with end-to-end observability
With groundcover, you never have to worry about missing an issue with a Deployment, such as a lack of available resources, a failed Pod or a problem pulling a container image. groundcover automatically alerts you to common Deployment failures, while also providing the critical, cluster-wide visibility and context you need to troubleshoot Deployment issues quickly.
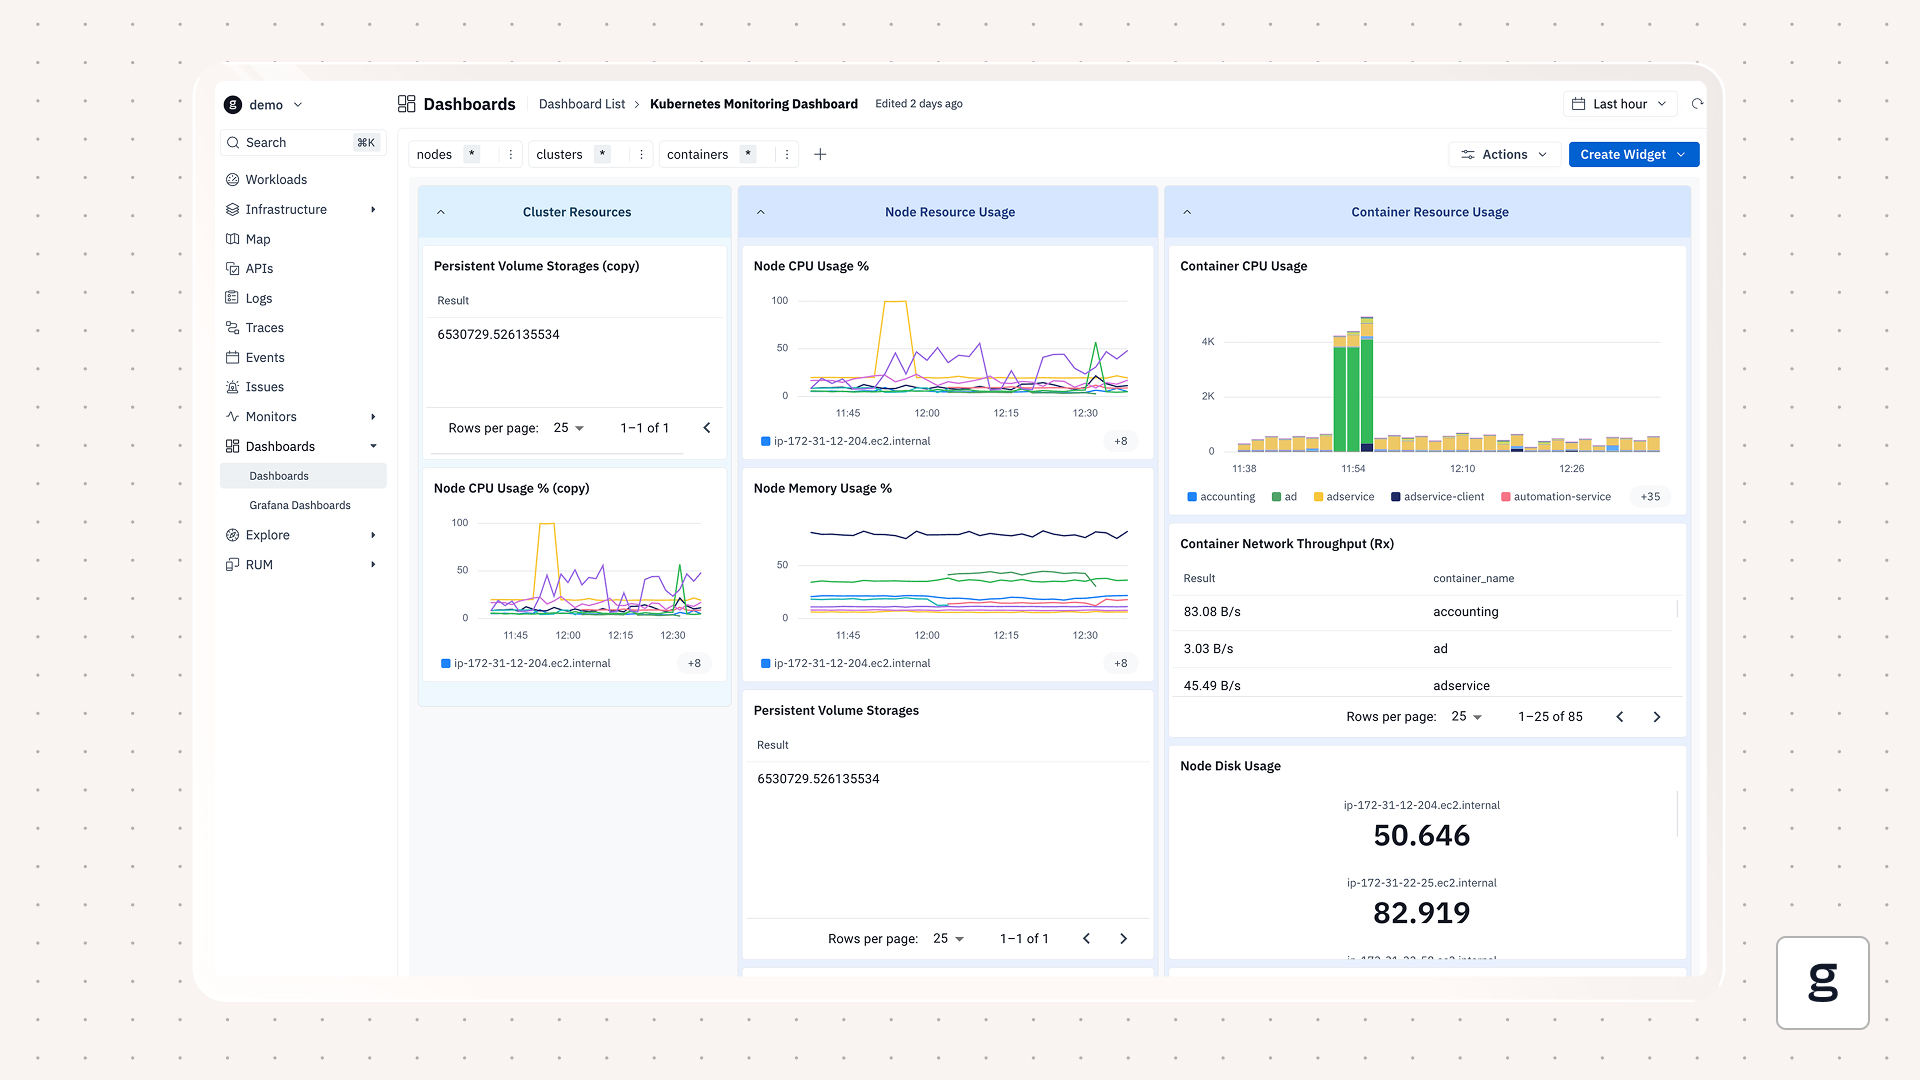
We can’t tell you how to configure your Deployments, but we can help ensure that your Deployments run smoothly and achieve optimum levels of performance.
FAQ
What metrics should teams monitor to ensure Kubernetes Deployments remain healthy?
Key metrics for monitoring Deployment health include CPU and memory utilization of a Deployment’s Pods and containers, which provide visibility into Deployment performance. You should also track desired vs. actual replica count to ensure that your Deployment is scaling as expected. Check as well for failed or unavailable Pods associated with a Deployment.
How do Kubernetes deployments handle failed rollouts automatically?
In the event of a failed Deployment rollout, Kubernetes will automatically attempt to restart the Pod or Pods associated with the Deployment. If the Deployment’s Pods fail on the restart attempts, Kubernetes will eventually stop trying. In that case, you would need to troubleshoot the root cause of the Pod failure, which could be an issue like a buggy or unavailable container image.
Can groundcover integrate with existing CI/CD workflows for Kubernetes Deployments?
Yes. groundcover can collect and analyze observability data as part of CI/CD workflows. In this way, groundcover provides the visibility necessary to detect application performance or availability problems. In turn, developers can take steps within other parts of the CI/CD pipeline to fix the issues, such as by updating and redeploying a container image.


.svg)