Kubernetes Cordon: How It Works, Challenges & Best Practices



Key Takeaways
- Cordoning stops new pods from being scheduled on a node but leaves existing workloads running, making it a safe first step before maintenance or troubleshooting.
- Cordon, drain, and taint serve different purposes: cordon blocks new scheduling, drain removes existing pods, and taints control which workloads are allowed onto a node.
- A reliable maintenance workflow is cordon, drain, maintenance, uncordon, with checks for Pod Disruption Budgets, DaemonSets, local storage, and termination grace periods that can delay or block eviction.
- Cordoned nodes need to be tracked and restored promptly, because forgotten
SchedulingDisablednodes reduce available cluster capacity and can push more load onto the remaining infrastructure.
Node failures and planned maintenance are a routine part of running Kubernetes at scale, and they are more common than most teams expect. The CNCF 2024 Annual Survey found that Kubernetes production use reached 80% of organizations in 2024, up from 66% the year before, which means the tools you use to take a node offline safely are no longer a niche skill. They are core to keeping a production cluster stable. The Kubernetes cordon command sits at the center of that workflow, and understanding exactly what it does, and does not do, is the difference between a quiet maintenance window and an incident.
This article walks through what Kubernetes cordon is, how it changes a node's status, how it compares to draining and tainting, and the best practices that keep node maintenance predictable even at scale.
What Is a Kubernetes Cordon?
Kubernetes cordon is a scheduling control. Running kubectl cordon <node-name> updates the node object's spec so the field unschedulable is set to true. The kube-scheduler reads that field on every scheduling decision, and once it is set, the unschedulable node is skipped for any new pods. The cordon command does not touch the pods that are already running there. It is a soft, reversible signal, not an eviction.
That single behavior is why cordon shows up constantly in day-to-day cluster operations. It gives an operator a way to say "stop sending work here" without immediately disrupting whatever is already running, which matters a great deal when existing pods are backing a live customer request.
Cordon vs Drain vs Taint
Cordon, drain, and taint all influence scheduling, but they operate at different layers and with different intent. Teams often reach for the wrong one and end up either causing unplanned pod disruption or leaving pods stuck on a node that never actually gets emptied.
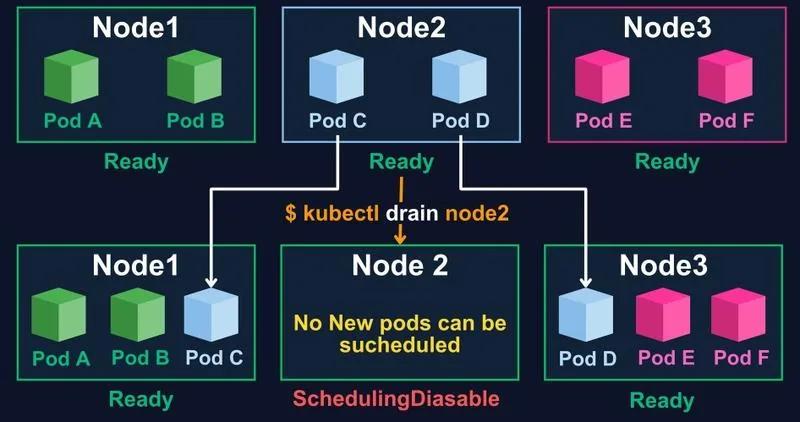
Source | Cordon Drain Uncordon
Why and When to Use the Kubernetes Cordon Command
Cordoning is usually the first move in any planned or reactive node operation. Common triggers include:
- Scheduled OS patching, kernel upgrades, or container runtime updates
- Scaling down a node pool where certain nodes will be removed
- Investigating a node showing early signs of hardware or kernel-level issues, before pulling it fully out of rotation
- Preparing a node ahead of a
kubectl drainso the pod count on it stops growing while eviction runs - Isolating a node during an incident so a suspected problem does not spread to new workloads
The command itself is intentionally minimal:
Output confirms the state change immediately:
Key Aspects of Cordoning in Kubernetes
Beyond the single command, it helps to understand exactly what changes on the node object when you cordon it, what stays the same, and how to undo it cleanly. The three sub-sections below cover each of those angles.
Purpose and Effect on Scheduling
The kube-scheduler filters candidate nodes for every new pod, and a cordoned node's status is excluded from that candidate list the moment unschedulable: true is set. This is enforced cluster-wide, so it applies regardless of which controller (Deployment, StatefulSet, Job) created the pod.
What Happens to Existing Pods
This is the detail that surprises the most people: cordoning a node does not affect existing pods at all. They keep their assigned node, keep serving traffic, and keep consuming resources exactly as before. If you cordon a node and stop there, you have only closed the door to new arrivals. Everything already inside stays put until you drain it, delete it, or it is rescheduled for some unrelated reason such as a node failure.
Reversing a Cordoned Node
Reversing a cordon is just as immediate as applying one:
This clears the unschedulable flag and the node object's status returns to normal, making it eligible for new pods again on the very next scheduling cycle.
How Kubernetes Cordon Works Step by Step
With the concepts covered, here is the actual sequence of commands you would run during a real maintenance task, from marking the node unschedulable through safely emptying it.
Cordoning a Node
Start by confirming the node's current status, cordon it, then confirm the change stuck:
A cordoned node shows SchedulingDisabled alongside its normal status:
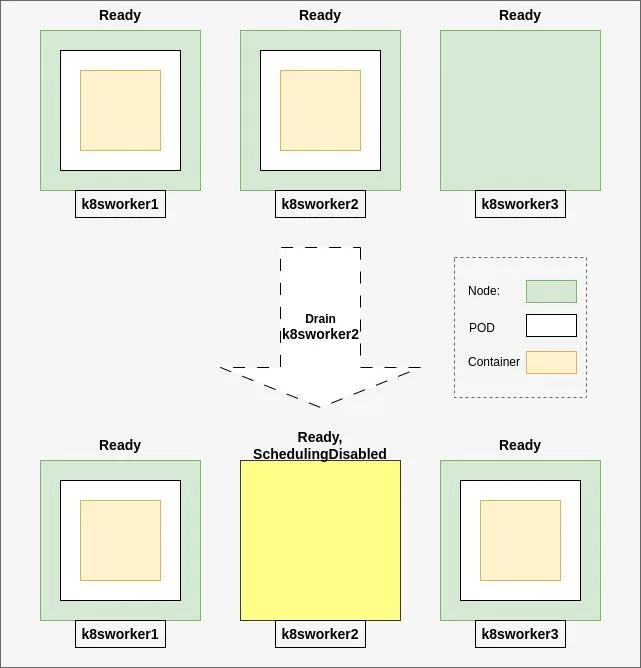
Source | Node Drain Workflow
Draining a Node Safely
Cordoning alone will not empty a node. To move existing pods off it, follow with a drain:
The --ignore-daemonsets flag is almost always required, since DaemonSet pods are designed to run on every node and drain will otherwise refuse to proceed. --delete-emptydir-data is needed if any pods use ephemeral emptyDir volumes, since that data cannot be preserved across a reschedule.
Handling Pods with Long Grace Periods
Pods with long terminationGracePeriodSeconds, or those backed by strict Pod Disruption Budgets (PDBs), can make a drain take much longer than expected. Kubernetes respects both settings by design, evicting pods gracefully rather than forcing them off immediately. For maintenance windows with a hard time limit, it helps to set a bound on the operation:
Use --force cautiously. It allows eviction of pods not managed by a controller, which means they will not be automatically rescheduled elsewhere.
Example Kubernetes Cordon and Uncordon Commands
A quick reference for the commands used most often during node maintenance:
kubectl cordon node-worker-03- mark the node unschedulablekubectl get nodes -o wide- confirm the node's status and check which pods are running therekubectl drain node-worker-03 --ignore-daemonsets- evict existing pods safelykubectl uncordon node-worker-03- return the node to the scheduling pool once maintenance is donekubectl cordon -l node-pool=batch-workers- cordon every node carrying a given label, useful for cordoning an entire existing node pool ahead of a rolling upgrade
Common Challenges and Risks with Kubernetes Cordon
Cordon is simple in isolation, but it fails in predictable ways once it meets real workloads, automation, and stateful data. The table below covers the issues teams run into most often.
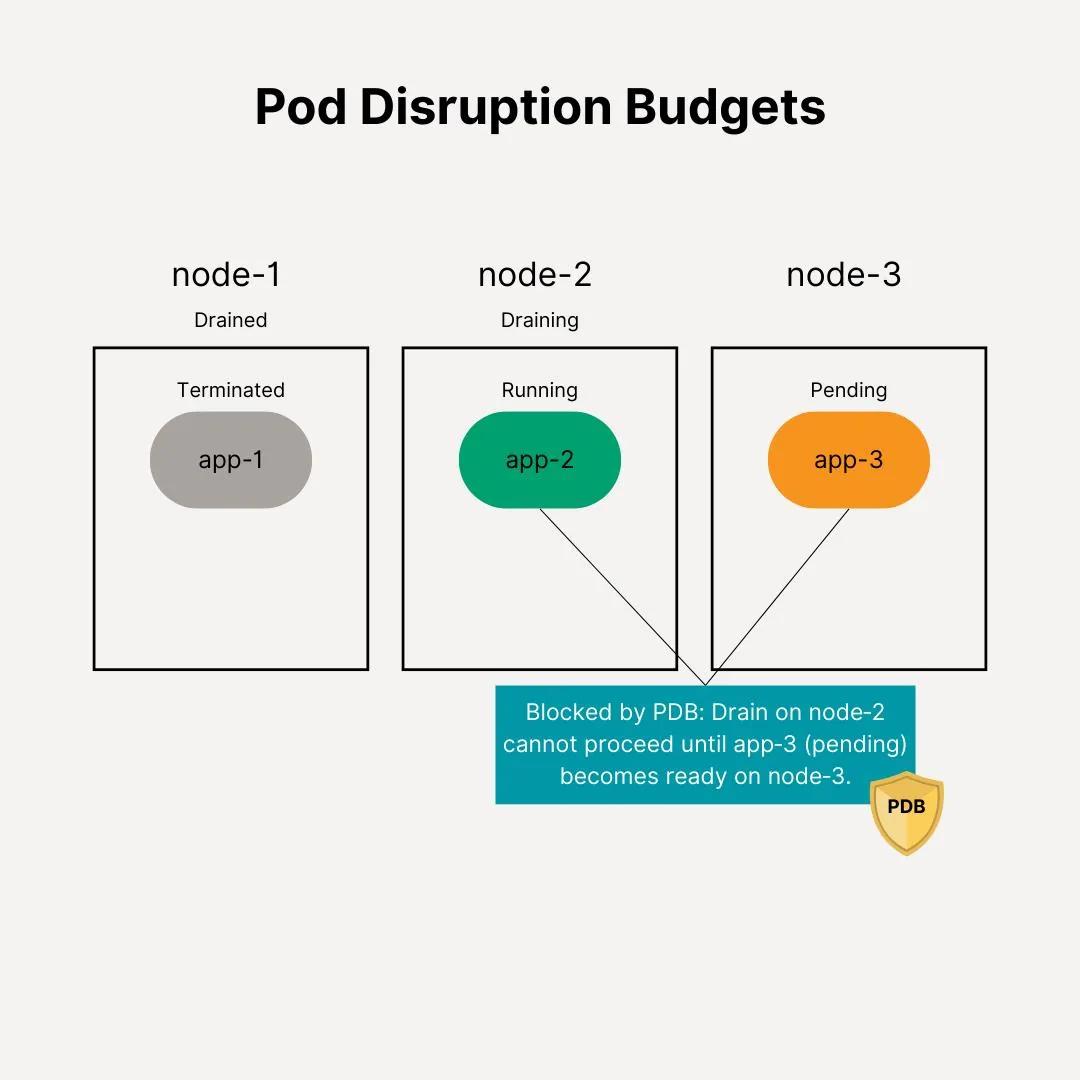
Source | PDB Drain Block
Best Practices for Node Maintenance Using Kubernetes Cordon
Most of the risks above are avoidable with a consistent runbook. These practices cover what to check before, during, and after every cordon operation.
- Always pair cordon with a drain step in your runbooks and automation, rather than treating cordon as the finish line.
- Check what is running on a node before cordoning it, so you know the blast radius if a drain is needed next.
- Set realistic Pod Disruption Budgets ahead of time. A PDB that is too strict will stall drains during real maintenance.
- Label and cordon by node pool when maintaining groups of nodes together, instead of cordoning nodes one at a time.
- Track cordoned nodes explicitly. A node left in
SchedulingDisabledstate for days is wasted capacity and easy to lose track of in a large Kubernetes cluster. - Always uncordon as the last step of any maintenance runbook, and verify with
kubectl get nodesthat scheduling has actually resumed. - Test drain behavior against your PDBs and grace periods in a staging cluster before relying on it during a production incident.
Automating Kubernetes Node Cordoning and Draining at Scale
Manually cordoning and draining individual nodes does not scale past a handful of clusters. Most teams automate this pattern with tools such as Cluster Autoscaler, Karpenter, or node-maintenance operators like Kured, which detect the need for maintenance (a pending kernel update, a scale-down signal, or a node health check failure) and run cordon, drain, patch, and uncordon as a single coordinated workflow.
Automating this workflow reduces the operational load of managing large clusters, but it also means the automation needs the same safeguards a human operator would apply: respecting PDBs, ignoring DaemonSets appropriately, and confirming uncordon completes before the node is considered "done."
Using Kubernetes Cordon for Cluster Cost Optimization
Cordoning has a quieter role in cost management. Before removing a node from an existing node pool during scale-down, teams cordon it first, verify it is safe to drain, and then let the autoscaler remove it entirely, avoiding a stranded, half-empty node that is still being billed for.
Faster Node Maintenance Visibility with eBPF Observability in groundcover
Cordon and drain are scheduling mechanics, but knowing whether they actually worked, and what happened to every pod that got moved, requires observability that keeps pace with the cluster. groundcover uses eBPF sensors to capture node and pod behavior automatically, without requiring code changes or manual instrumentation, which matters during a maintenance window when you need answers fast rather than a new dashboard to configure.
With groundcover's Kubernetes monitoring, teams can watch pod rescheduling in real time as a drain proceeds, confirm that evicted workloads landed in a healthy state elsewhere, and catch cases where a stuck PDB or a long grace period is quietly stalling a maintenance job. The eBPF sensor page covers how that sensor layer ties node-level events back to service-level impact, so a cordoned node's status is never disconnected from what your users are actually experiencing.
Getting started takes a self-service sign-up with a 14-day trial that unlocks the full platform before scaling back to groundcover's free tier, so a team can validate this against their own node maintenance workflow without a lengthy procurement cycle. groundcover runs inside your own AWS, GCP, or Azure environment through its BYOC architecture, so telemetry never leaves your infrastructure.
Conclusion
Kubernetes cordon is a small command with an outsized role in cluster reliability. It gives operators a safe, reversible way to stop new pods from landing on a node while leaving existing workloads untouched, which makes it the natural first step before a drain, a node pool scale-down, or an incident investigation. Understanding how it differs from draining and tainting, planning for PDBs and long grace periods, and pairing every cordon with a deliberate uncordon step are what turn this simple mechanism into a dependable part of node maintenance rather than a source of stranded capacity.
FAQs
Yes, cordoning first creates a clean operational boundary by preventing new pods from landing on the node while you assess whether eviction is safe.
- Check the node’s workload mix first, especially StatefulSets, unmanaged pods, and workloads using local or
emptyDirstorage. - Verify replica health and available capacity on other nodes before beginning eviction.
- Treat
cordon → validate → drain → maintain → validate → uncordonas one runbook rather than independent commands. - Alert on nodes that remain
SchedulingDisabledbeyond the expected maintenance window so forgotten cordons do not silently reduce capacity.
PDBs should preserve the minimum service capacity required during voluntary disruption while leaving enough eviction headroom for the largest maintenance operation you expect to perform.
- Test PDB behavior against realistic node failures and rolling maintenance rather than validating manifests alone.
- Avoid combining a strict
minAvailablewith too few replicas, because a single unhealthy replica can eliminate all voluntary disruption headroom. - Monitor unavailable replicas before maintenance; a technically valid PDB may become operationally restrictive when the service is already degraded.
- Run drain simulations in staging using the same replica counts, topology constraints, and termination behavior as production.
Learn more about Kubernetes deployments.
Automation should verify workload recovery and service health, not merely a successful kubectl drain exit code, before proceeding to node termination or the next maintenance target.
- Confirm evicted replicas become
Readyon replacement nodes and remain stable beyond their initial readiness transition. - Correlate the maintenance interval with latency, error rate, restart, and
Pending-pod changes. - Put concurrency limits around node-pool maintenance so several successful drains cannot collectively exhaust cluster headroom.
- Make uncordon or node termination an explicit state-machine transition with timeout and rollback handling.
groundcover’s eBPF-based visibility can connect Kubernetes infrastructure changes with application behavior, helping teams determine whether workloads merely rescheduled successfully or actually remained healthy after the move.
- Compare service latency and errors immediately before, during, and after the drain rather than relying only on pod readiness.
- Investigate network behavior when a replacement pod is healthy according to Kubernetes but downstream requests begin failing.
- Correlate pod and node changes with service-level signals to reduce the gap between cluster operations and application troubleshooting.
- Use the same workflow during planned maintenance and incidents so operators do not need separate instrumentation when a node suddenly becomes suspect.
Explore groundcover’s eBPF sensor.